
A couple weeks ago I received my first polishes by Painted Polish by Lexi. I was drawn to the line because, well, sparkly. I decided to pick up all four of the new holo glitter line to see how they all compared. I've compiled a couple collages for you today and can I just say that I'm STILL DRUNK on all that holo. All pics below were taken in direct sunlight with my new macro lens. Note that these aren't straight-up swatches per se, I've taken steps to amplify the glitter that involves using a complimentary polish as a base coat. Read on below.
BONUS: Video tutorial on how to maximize glitter payoff at the end of the post.
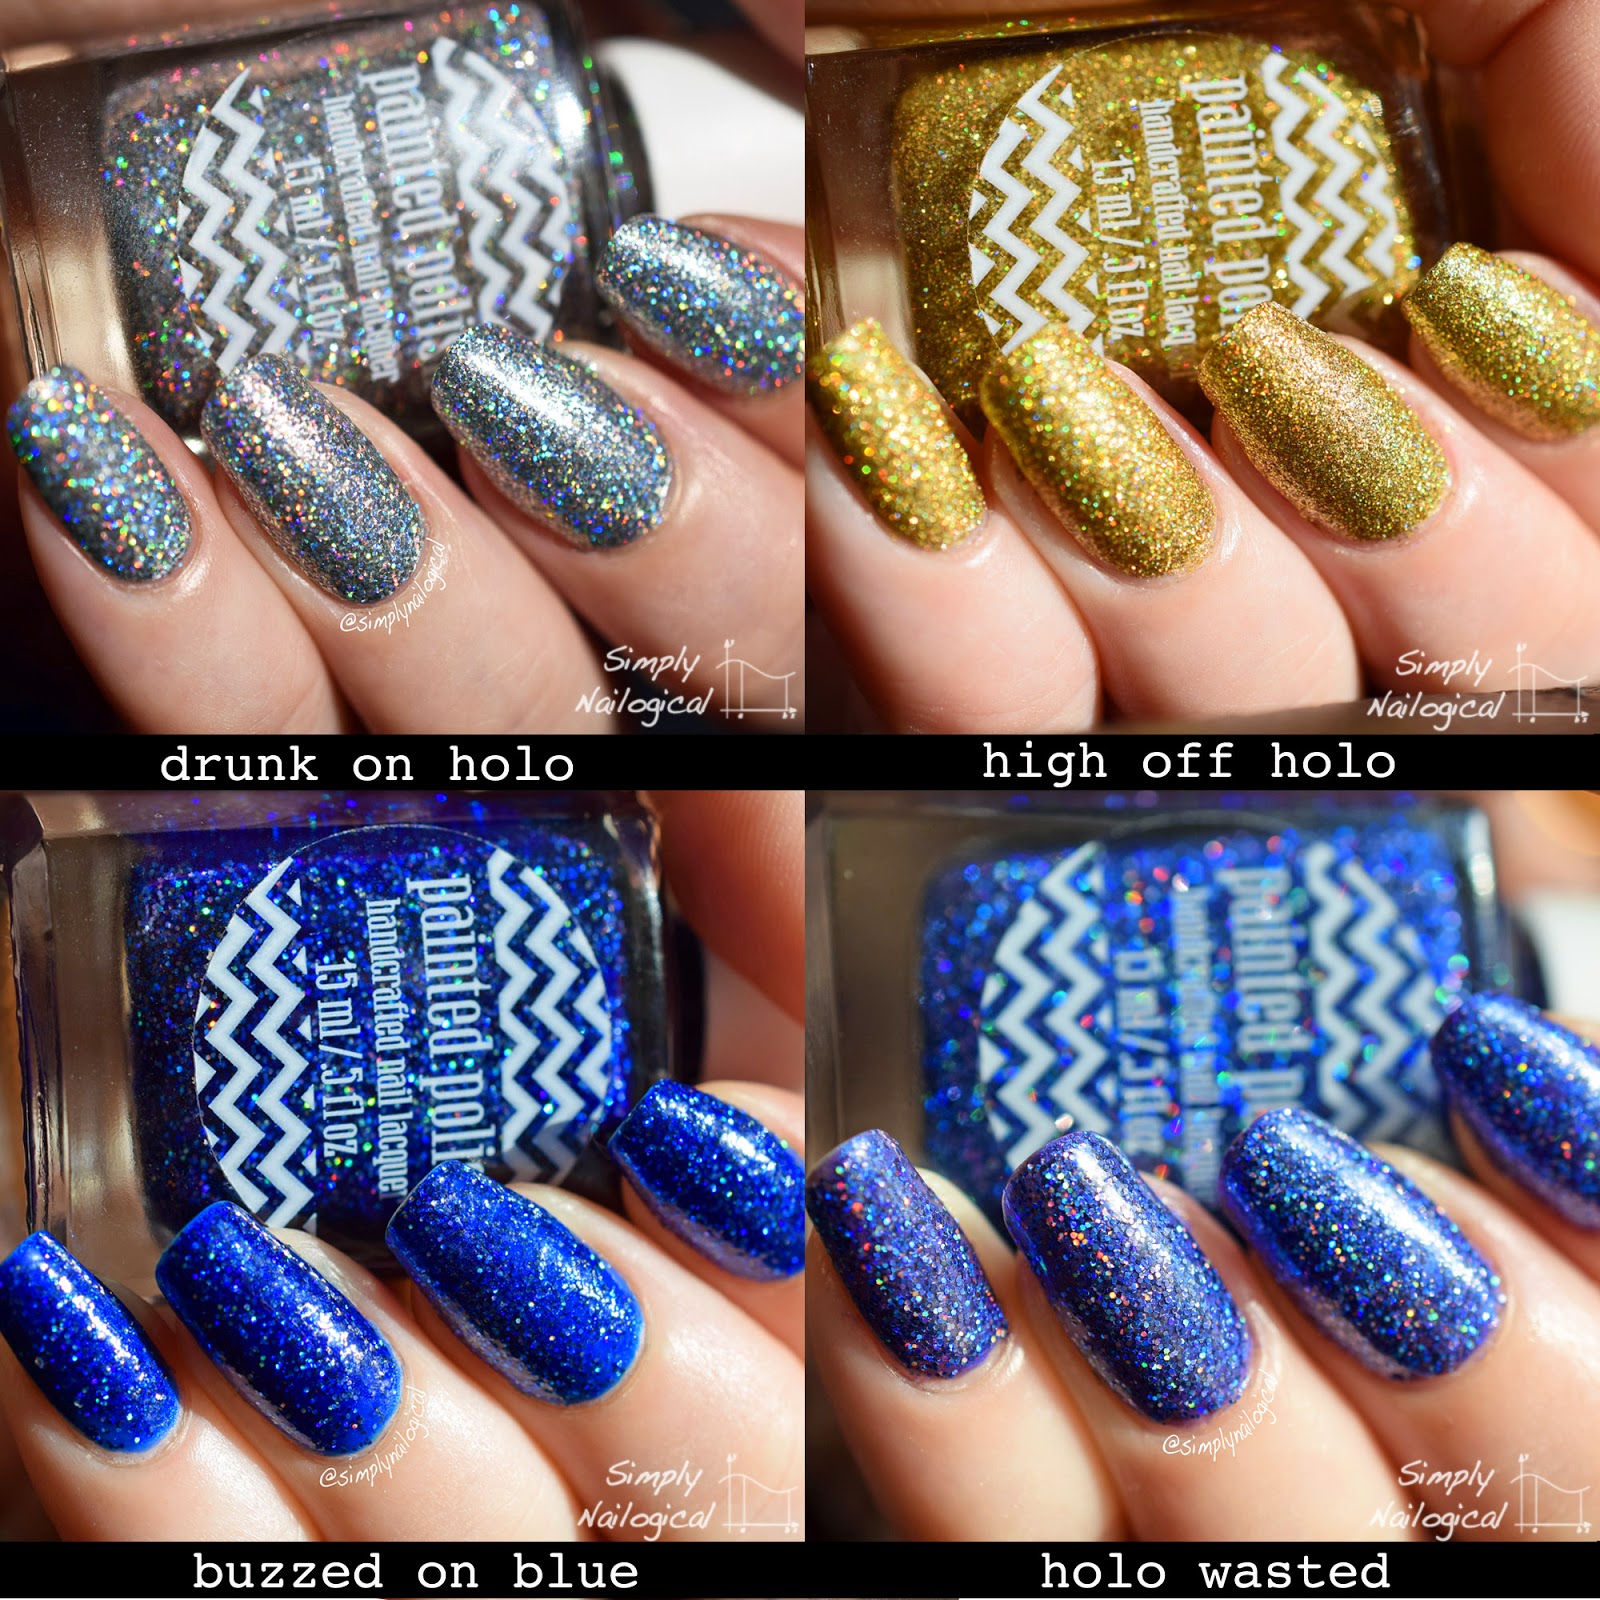
Let's break this down. First up, 'holo wasted', a cool-toned purple holo glitter in a clear base.
Pretty goddamn awesome. The glitters shine all sorts of pinks, blues, yellows, and all colours of the rainbow in the sun. As you can see in the bottle shot below, the glitters are somewhat dispersed in the clear jelly. I've taken a few steps to yield a completely opaque glitter application on the nail. More on that and a video tutorial at the end of the post. No top coat here.


Next up, 'high off holo', a holo gold micro-glitter in a clear base whose glitters are indeed finer than the rest of the line creating more of a finely crushed gold look as opposed to a chunky bullion style. This polish required an extra coat more than the others to create complete opacity on the nail given it's finer formula. No top coat.


'Buzzed on blue' is unique in this line in that its holo glitters are suspended in a dark royal blue jelly. When I first applied this polish to the nail I thought it was for sure going to be a stainer, but nope! No stains whatsoever. The blue jelly somewhat mutes the holo glitters depending on how they fall on the nail, but I find the effect balances out the holos with a deep blue which translates to a more sophisticated stunner. In fact I wore this polish plain and by itself to the office! This was the only polish I felt needed a top coat to amplify it because it dried a bit matte without one, so these pics are with top coat.


Last we have the people's favourite, 'drunk on holo'. This polish is everything I thought it would be and more. Its silver holo glitters in a clear base are so densely packed you'd think it's an endangered element. No top coat here. If you've been searching for the most holo of glitters in all the land, stop right now, bow down, and take a swig of drunk on holo. It's so intoxicating that people stop in the streets, stare, jaws dropped, and fall over. You've been warned.


Here's a super blurry pic as evidence of the liver cell murdering toxins in this baby.

Now, you ask, how do I achieve this super dense glitter look?
Painted Polish advertises that these holo babies become opaque in three coats with no undies. Other nail bloggers such as @sloteazzy on Instagram have been true to the swatching ritual and have already offered up swatches of these polishes with three coats each. Personally I was not satisfied with what three straight up coats of these polishes attain, I wanted MORE sparklies. So instead of the traditional swatching, I used a complimentary nail polish as a base coat for each glitter. This involved using a highly metallic or reflective polish that was the same colour as the glitters for each polish. So, think gold or silver metallic polish. Chrome is ideal, metallic is second best. For the blue and purple holos I did not have a chrome or metallic polish that matched, so I used a shimmery polish as a compromise. The key here is choosing a base that is very close or the same as the primary tone of the glitters, something that will amplify the glitter power.
The second thing I did differently was the way I applied the polish. I used a make-up sponge to tack on the first two coats of glitter after the polish base coat. This results in a more targeted and dense application of the glitters since the sponge absorbs some of the clear (or blue) jelly base and leaves the glitters behind to smack onto the nail. After two coats of sponged-on glitter (wait at least 5mins between all coats, no top coat), I proceeded to apply two more coats of the glitter with the polish brush but carefully rid the brush of excess jelly by pressing the brush up against the rim of the polish and letting the jelly sink down off the brush and down into the bottle. This is more clear in the video. In total I used four coats for all polishes, two sponged coats and two applied with the brush.
To top coat or not to top coat? I decided against the standard top coat procedure because I wanted to let the holos shine in all their glory without potentially confounding their glare with shiny top coat. I did, however, add top coat to 'buzzed on blue' because the polish dried a bit matte compared to the others (must be the blue jelly).
1 MINUTE OR UNDER VIDEO TUTORIAL:
How to maximize glitter polish payoff
(see also 15sec Instagram version)
This application technique applies to any glitter, clear jelly or otherwise. I also do the tips of my glitter gradients using a sponge to achieve full glitter opacity (will have a tutorial up on that eventually).
These holo babies are available from Painted Polish's shop but are usually a pre-order item because they are so sought after. Be sure to follow @paintedpolishbylexi on Instagram or on Facebook for updates about re-stocks.
Polishes used:
- Painted Polish 'Holo wasted' (purple holo glitter)
- Painted Polish 'Drunk on holo' (silve holo glitter)
- Painted Polish 'Buzzed on blue' (silver holo glitter in a blue jelly)
- Painted Polish 'High off holo' (gold holo glitter)
- China Glaze 'Tempest' (indigo purple shimmer used as base for Holo wasted)
- OPI 'Push and shove' (silver chrome used as a base for Drunk on holo)
- China Glaze 'Frost bite' (royal blue shimmer used as a base for Buzzed on blue)
- Quo by Orly 'Filthy rich' (metallic gold used as a base for High off holo)


I am soo tempted by these!!
ReplyDeleteThey are very alluring aren't they!! Sooo sparkly :O
DeleteI just used your tutorial on maximizing glitter. It's excellent, and I plan on using it a lot (as I LOVE glitter)! So from a fellow Canadian, thanks!
ReplyDelete